This post is presented by our media partner Garden Culture Magazine
View the original article here.![]()
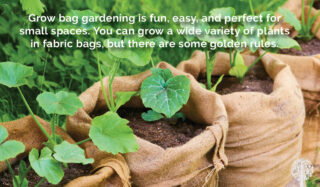
Grow bag gardening is a fun and easy way to get into the growing game. I’ve had great success growing everything from small-size pumpkins and eggplant to tomatoes, potatoes, and flowers in fabric bags. Lightweight and portable, grow bags are perfect for urban areas, patios, and balconies. But before you get started, you should know a few golden rules about growing in bags.
Size Does Matter: What Size Grow Bag Should I Use?
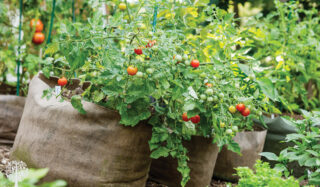
Select grow bags proportionate to your growing plans. For example, I grow a single mini-pumpkin plant in a 25-gallon bag and one indeterminate tomato in a 15-gallon bag. Peppers, cucumbers, and potatoes all do well in 10-gallon bags. Herbs and flowers are fine in 2 to 5-gallon bags. And don’t overcrowd the plants! It’s tempting to cram many seed potatoes into a 10-gallon bucket, but in my experience, three should be your max for a good yield.
Choose Varieties Wisely: How to Choose Crops for Your Grow Bag
The size of the bag matters, and so does crop variety. I generally keep larger-size crops, like squash and indeterminate tomatoes, in my raised beds. That’s not to say it can’t be done, but you’ll have better luck selecting bushier, compact porch varieties for fabric pots. Determinate tomatoes like Patio Girl, Celebrity, Tiny Tim, and Micro Tom are excellent choices. Patio snacker cucumbers and Dragon’s Tongue bush beans are, too, as are Sweetie Pie and Baby Boo pumpkins. One of my favorite things about seed shopping is learning about the fun varieties out there, and there are many for small spaces!
How Often Should I be Watering my Grow Bag?
Plants typically do better in grow bags than in other containers because their roots are aerated and have more growing space. It’s not uncommon to eventually see a web of roots outside the fabric bag! However, using fabric also means the soil will dry out faster because water can easily leach out of the bottom and the sides. Invest in a moisture meter; this tool has been invaluable to my grow bag gardening ventures. While my raised beds have had enough moisture for days in the heat of the summer, my grow bags have rapidly dried out and require more TLC. I like to water my crops in the morning; I’ll wait for the soil to absorb the water and then add more to be sure the roots get the drink they need.
Be Generous With Nutrients
When the water leaches out of the bottom and sides of grow bags, it takes a bunch of essential nutrients along for the ride. Soil quality always matters, no matter the type of garden you grow, but it is crucial with grow bags. Purchase a top-quality and complete urban soil mix, or make one yourself. Ensure the bags contain plenty of compost, worm castings, coconut coir or peat, seaweed fertilizer, and regularly amend. The growing medium has to be able to absorb and retain nutrients and moisture. In his book Grow Bag Gardening, Kevin Espiritu (of Epic Gardening) offers recipes for several different grow bag soil mixes.
Have Fun With It
Like any garden, it’s essential to enjoy the experience of growing your food and flowers. Grow bags are versatile; you can select colors and sizes that suit your style. Place the bags in front of a pretty trellis and let your plants climb. Design different kinds of kitchen combos, whether culinary herbs, a stir-fry bag, or a salsa garden (all sketched out in Kevin Espiritu’s book). Finally, have fun experimenting with different plant varieties. Last summer, I grew giant sunflowers in grow bags scattered around my yard. I had mini-pumpkins trailing out of 25-gallon bags nearby, and it was whimsical, especially in the fall!
This post was originally published by our media partner here.